


TrackIR 4 Pro camera
Ever heard TrackIR??? I bet none of us have ever heard that except for those who are very concern about their gaming experience. Well, the story goes like this. Some hardcore gamers find out their control of perspective (using mouse for First Person Shooter, or Joystick's Point-Of-View Hat for Flight Sim, or buttons for racing sim) is not enough to cope with their needs of awareness sensitivity and sometimes information overloading start to burden these pilots. They need something that can upgrade their situational awareness so that they are aware of what happening around them (to check his 6 o'clock for bandits let's say).
Then, TrackIR comes with the solution manufactured a head tracking device. This device will track your head movement and they will simulate the movement into the game's perspective. TrackIR is using a specially developed camera to detect either the reflection of infrared from another source or the infrared beam itself. The reflector or the source of infrared often put into a baseball cap. This solution is great giving a player the luxury of natural head movement in looking around, but the solution is expensive. Especially for us Malaysian that will needs to order the device right from US.
However, another alternative solution is available right in the net. FreeTrack is a program that will provide you the ability to track your head movement as in TrackIR however it is not an expensive solution. The program is available totally for free. The only thing you need to spend is the hardware for the program to detect your head movement.
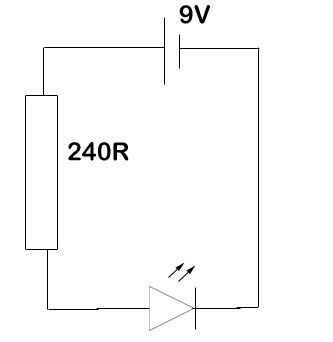
My 1 point cap configuration circuit
I've been experimenting with this tonight and what I say it is brilliant and nothing less compared to TrackIR (from the vids that I've saw saying they're using TrackIR). The head movement is quite natural if you can calibrate it perfectly. I'll upload a video of the demo later. Let's talk about the hardware of the head tracking device first.
What we need is LEDs, resistors, wire, and battery. Of course to assemble a circuit you gonna need soldering iron. The amount of LEDs and resistors needed depends on the configuration. FreeTrack supported 4 types of configs, 1 point cap mount, 3 point clip mount, 3 point cap mount, 4 point cap mount. 1 point cap configuration will give you 2DOF, that is up-down and left-right. With 3 point clip, 3 point cap and 4 point cap you can get 6DOF those are up-down, left-right, roll, x plane movement, y plane movement and z plane movement. However, 4 point cap is a little hard to assemble so I tried to assemble a 3 point cap mount as it is not ideal to create a clip for that. However, after few test I found that 3 point cap configuration is a little bit hard to calibrate as 1 tracking point usually will be out of sight after few degree turn. So, I then change my plan to 1 point cap configuration.
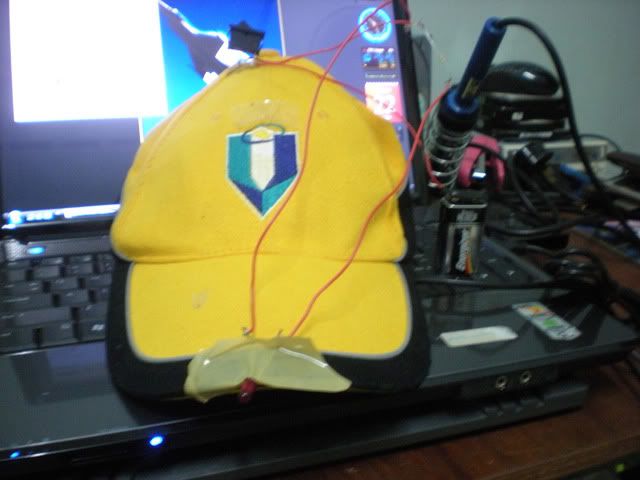
My prototype of head tracking device
FreeTrack do recommend to use infrared LEDs, however a simple visible red light LEDs is good enough for tracking purpose.
Another important hardware is a webcam. A normal regular webcam is good enough. You can get them in computer store cheaply. Not even for hundred bucks. Logitech's webcam is good but you can save the money if you are playing on your laptop with a built-in webcam.
Total cost for hardware will depends on your configuration and without the battery, it won't reach RM10. Plus webcam, it should not be more than RM90. I bet, this could be done only within RM50 budget.
As for the software part, you can download it from FreeTrack Website and a little config is needed. First you need to set various settings of your camera like brightness, contrast all to zero. And when you push the button start in the software interface you'll adjust the threshold until you can only see one tracking dot(s) marked with a cross. Then, you can adjust the sensitivity.
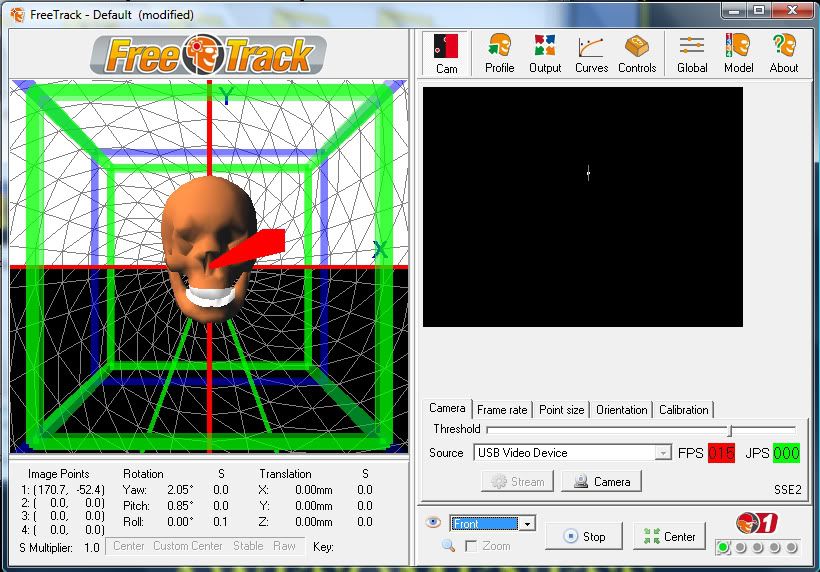
The interface of FreeTrack, notice one white dot in the blackbox, that's the tracking dot detected by the camera
I tested my 2DOF 1 point cap with Falcon 4.0: Allied Force (a really complicated flight sim) and it comes out great. I can check my six faster than before and never actually lost track of a bandit with its radar locking on my six. I even managed to figure out what to do (which I never did before due to info overload, again this is a very complicated flight sim that would take months to master with 800 pages of manual) and bring down that MiG-29 to its doom. However, I still need a few more practice with this device until I came to master the control. Well, with only few minutes of practice I can actually figure out to make the bandit overshoot and bring him down with my AIM-9L, it's very good. Before this I can't even shake them off. Haha....
So, instead of spending USD99.90 or RM359.40 (and that is without tax and import duty) it is really worth it to spend half an hour making this and spend another RM50 for a webcam.
p to the s: a review on the Falcon 4.0: Allied Force is coming soon. Wait for it. Like I said, it would take months of training to dogfight in this game effectively. It's pretty much like flying the real F16 out there without the hard 7G giving you GLOC.


5 comments:
tak paham aku..
=(
huk alooo... sng ckp nk tgk kiri kanan dpn blkg xyah pakai butang pape. gerak kepala je...
malas nak bace. sbb aku bukan gamers tegar, but then, mu reka ke tuh? the lasy pic, i mean. wow!
len kali bace... baru mung dok terkesima... all i did is the circuit which happen to be very easily assembled even by a 12 year old child...
lain kali, tipu je aku pun xpe =P ahaha
Post a Comment